Modelling with Excel Part 10: Test and Validate
Stephen Hall wraps up his series on how to use Excel for project engineering. Download the interactive workbook to experiment with the entire series
Through this series of articles, I have described and provided various tools and strategies for developing engineering models in Excel. If you can define an outcome and develop an algorithm, you can design a spreadsheet to be proud of. However, ensuring the accuracy and reliability of your complex model is paramount. As the complexity of your work increases, so does the potential for errors and inaccuracies. In this context, it is imperative to deploy various verification and validation techniques to guarantee the integrity of your Excel-based models.
This article presents a range of methods to test and validate your work. Use techniques that are commensurate with the complexity of your model, its intended use, and its expected longevity.
Documentation
Each calculation and model must be accompanied by clear and explicit guidelines. These guidelines can be placed on a dedicated worksheet, included on the calculation sheets, added as comments to specific cells and VBA subroutines, or documented in a separate file. The primary objective of this practice is to outline the workbook’s scope and function. This may not be relevant for a calculation that you are going to use once and then discard. But it is beneficial to create documentation for any model that will be utilised repeatedly.
There are two important reasons for writing instructions. The initial goal is to enhance the user’s experience. You have probably encountered a situation where a colleague shares a spreadsheet, and when you open it, you are greeted with a screenful of labels and numbers. Without sufficient context, you feel frustrated as you try to grasp the intent behind the calculations and their intended use. If the creator of the spreadsheet had included an introduction or even provided the most basic instructions, it would have alleviated your frustration.
The second reason is that it will help reveal errors, omissions, limitations, and assumptions in your workbook. As you prepare instructions, you may find that the organisation of your model’s inputs and outputs can be improved, uncovering opportunities for increased efficiency and accuracy. Additionally, this process may shed light on any hidden flaws or oversights that could potentially affect the reliability and effectiveness of your workbook.
Record the date when you update a workbook. Significant changes to calculations and procedures should be noted, possibly in a version control table that is located with the instructions. Multiple versions of workbooks tend to proliferate; it is important to know if you are using the most recent or relevant version.
Check your own work
You know the intended outcomes from your models, and you probably have a good idea what the results should be. Use that knowledge to rigorously test your own work. Surprising answers could be due to mistakes in the formulas. Methodical testing will uncover errors in the calculations, logic, and user interfaces. And, by the way, update your documentation as you proceed with testing.
Unit testing
As demonstrated throughout this series of articles, workbooks can include a myriad distinct calculations and algorithms that are woven into comprehensive models. The distinct parts can be tested independently to ensure that each performs as intended. With that assurance, if the completed assemblage fails to deliver, you can narrow your focus to the code that calls the subroutines. This makes it easier to identify and fix issues.
You can write routines to test the individual parts. VBA functions and subroutines often act upon variables that are passed through arguments either “by value” or “by reference”. Your test routine will define values for those parameters, call the function or subroutine that you are testing, and report the result. Use this method to exercise the subroutines that are under test by passing the full range of possible values for the variables. Try with illegal values (including null, negative, and text values when your routine is expecting a positive numerical input) to be sure that your subroutines respond appropriately without crashing.
Arguments for a subroutine default to passing data “by reference”. Both “Sub Test(T)” and “Sub Test(byref T)” have the same effect. When an argument is denoted as “by reference”, the computer’s memory holds a single location for the variable (“T” in this case); any modification made to it affects the entire program. For instance, if the temperature value is in degrees Celsius and you convert it to degrees Fahrenheit within a specific subroutine, passing the temperature “byref” would result in the change being applied to all other subroutines. To prevent this, pass it “by value” instead, using “Sub Test(byval T)”.
Unit testing can also include performance testing. This involves calling a function or subroutine thousands of times and timing the execution. By doing this you can compare alternative algorithms to identify the one that executes the fastest. This is particularly important when dealing with large datasets, or complex calculations.
Sensitivity analysis
When you think your model is functioning correctly, try running it repeatedly while changing one variable at a time. Run the model with combinations of low and high values that lie at the extents of your design space. You might discover errors in the model’s algorithms. You may also derive insights into the behaviour of the system you are studying and learn how different variables affect the results. These insights can point to areas of your workbook that deserve additional attention.
Cross validation
Whenever possible, check results by running your data through an independent calculator. This is probably impossible for an entire model since your work will be uniquely yours. However, some calculations, such as physical property evaluations, heat transfer coefficients, and pressure drop calculations can be checked using online calculators or tables of “typical” values that are found in published works.
Use Excel’s built-in tools
Formula auditing
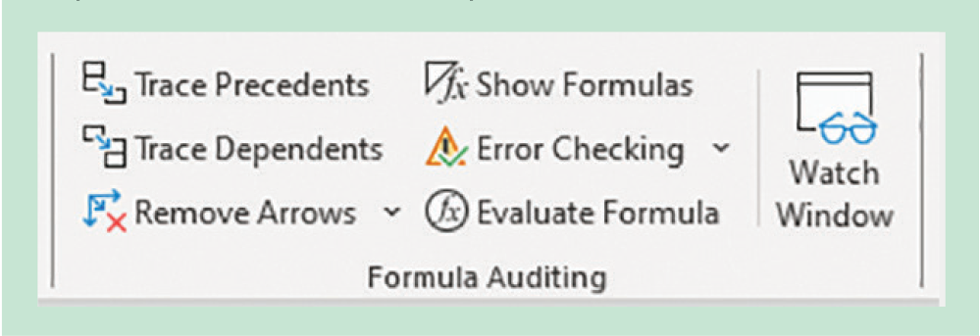
The Formula Auditing section of the Formulas ribbon contains various tools to help you check and debug formulas in your Excel workbook (Figure 1). Hover over a tool to see a short description of its function. The Trace Precedents and Trace Dependents tools help you visualise which cells are referenced by the currently selected cell. Error Checking automatically identifies and highlights potential errors in your formulas and provides suggestions for correction.
Background error monitoring
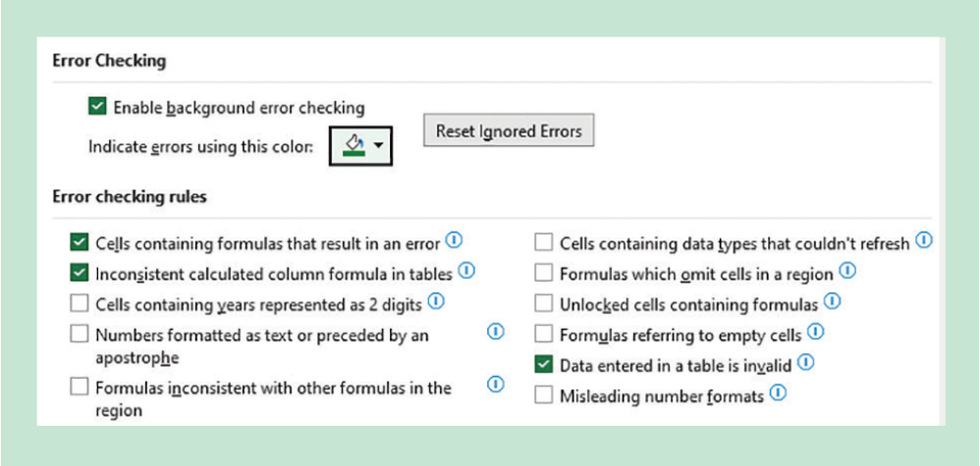
Excel can continuously monitor your workbook for potential problems and flag them with coloured dots in the corner of cells where errors are suspected. Navigate to File…Options…Formulas to customise which types of potential errors are flagged and set the colour of the dot (Figure 2). This allows you to quickly identify and address errors as you work on your spreadsheet.
Circular references
These occur when a formula refers to its own cell or depends on a chain of formulas that eventually refer back to the original cell. This is a common problem and Excel provides several tools to help you avoid and fix them. When you enter a formula that has a circular reference, Excel immediately presents a dialogue box to alert you. After dismissing the dialogue, Excel will visually trace the precedents of the cell to help you understand the loop. The cell address is shown at the bottom of the screen in the status bar. You might want to use circular references, but do this with caution. You can enable them from the File…Options…Formulas window.
Error checks and validation rules
Excel’s Conditional Formatting feature is incredibly useful for identifying potential issues. It offers numerous predefined “rules” that determine when a cell should be formatted differently which draws your attention to the cell. Moreover, you have the option to create custom formulas that trigger conditional formatting when they evaluate as “TRUE”.
Another useful tool to utilise is Data Validation, which guarantees that data entries adhere to specific criteria that you define. These criteria can encompass numeric ranges, distinctions between integers and decimals, dates, times, lists, and even formulas. Additionally, you can customise an error message to appear when a user makes an incorrect entry and specify whether the error halts the workflow or merely serves as a warning.
Ask for help!
Peer review
Regardless of how well you have “perfected” your spreadsheet, an impartial evaluation is bound to discover imperfections. These problems may not be computational errors; your calculations and algorithms may, in fact, be perfect. But your independent tester might try to enter data in an unforeseen manner, or they may misinterpret results due to inadequately detailed documentation. You should seek reviews from people who have similar competencies to you regarding the purpose and nature of your spreadsheet.
Peer reviews often focus on technical aspects, adherence to standards and use of best practices in addition to identifying potential calculational errors. Let your workbook and documentation stand on their own. Your reviewers will ask questions if they are confused; this is valuable feedback that will help you improve the organisation of your spreadsheet and point to weaknesses in your documentation.
User acceptance testing
The main goal of a user acceptance test (UAT) is to ensure that the model is fit for purpose, is user friendly, and it meets the end user’s expectations and needs. Your end user or their representative usually perform UATs. Therefore, this testing is normally done when you think the work is close to completion.
A formal approach to UAT includes verification testing. Start with the end user’s specific requirements. Determine which functions and modules in the spreadsheet address each requirement, and design software tests that demonstrate compliance. Then create a trace matrix that links the results of each test to the requirements.
External audit
While peer reviews and UATs focus on the model’s inner workings and conformance with the user’s expectations, an external audit is concerned with compliance with external requirements such as regulatory or industry standards. It is applicable if your model is going to be used to satisfy those standards. For example, a calculation that is used to confirm that air emissions from a storage tank vent are within permitted limits could be audited by the permitting authority to affirm its accuracy.
Historical data analysis
Our Excel models are intended to mimic a real-world phenomenon. We use them to design new plants, troubleshoot existing ones, find bottlenecks, optimise energy consumption, and plan production schedules. Extensive testing and verification of the model’s calculations and algorithms will yield a beautiful spreadsheet. But are the results accurately simulating the real world? The spreadsheet might underpin a significant capital investment. We need to be vigilant in our testing, acknowledge that models have limitations, recognise uncertainties that are attached to our assumptions, and provide forgiving process designs. With that spirit, strive to validate your models with field observations. Here are two examples:
I created my jacketed tank heat transfer model over 25 years ago. The spreadsheet has undergone several major revisions and numerous updates. Over the years I have sought real-world performance data in the form of heating and cooling curves. Some of them were published, while I obtained others from data historians at manufacturing facilities. With the real performance curves in hand, I entered the plant data into my spreadsheet (tank diameter, jacket type, agitator, heat transfer fluid, flow rate, temperatures, etc) and ran my model. In these tests my model has accurately replicated the observed heating and cooling rates which gives me great confidence in my model’s capabilities.
Likewise, I sometimes create hydraulic models for purified water storage and distribution systems. My models calculate flow rates and pressure profiles. Typically, the systems use variable-speed centrifugal pumps to circulate water past use points, where water is dispensed to process equipment, and returned through a backpressure control valve to a storage tank. When my model is designed for an existing system, I always make field observations for pump speed, pressure, water temperature, and flow rate. Then I compare my model’s projections with the actual field data to ensure that the model accurately simulates the plant’s performance. This instils confidence in the reliability of the models I produce for new, yet to be constructed, systems.
Concluding remarks
Through ten issues of TCE this year, I have scratched the surface of my topic, Modelling with Excel. I have provided tips and tools and given examples of completed models and simulations. If you were already familiar with some or all of the material, I trust this review has inspired you to new heights. Based on feedback, I am delighted to have introduced novel facets of Excel to readers who are relatively new to Excel and VBA.
My primary goals are to impress the importance of user-friendly design and a relentless quest for error-free models. These goals can be met through effective planning, thoughtful layout, adherence to style guidelines, and rigorous testing. I stress that Excel models need documentation and version control.
These articles were not intended to comprehensively cover Excel’s extensive functions and capabilities. Instead, I want to inspire you to envision the potential outcomes from a model and empower you with confidence that you can achieve these outcomes with Excel.
This is the tenth article in a series that provides practical guidance on using Excel for project engineering. Download the companion workbook from https://bit.ly/ModellingWithExcel.
To read the rest of the articles in this series, visit the series hub at: https://www.thechemicalengineer.com/tags/modelling-with-excel
Disclaimer: This article is provided for guidance alone. Expert engineering advice should be sought before application.
Recent Editions
Catch up on the latest news, views and jobs from The Chemical Engineer. Below are the four latest issues. View a wider selection of the archive from within the Magazine section of this site.