Modelling with Excel Part 2: Naming Conventions
Stephen Hall continues his series on how to use Excel for project engineering. Download the interactive workbook to experiment with as the series develops
Spreadsheets are powerful and capacious. Names are a critical key to managing the data and information that your models rely upon. You can give natural-language names to cells, ranges, constants, and references. Doing so provides many benefits including reducing errors, improving readability, providing faster navigation, and improving flexibility by enabling structural changes to the workbook without “breaking” the workbook’s code. This month’s article is devoted to describing various types of names and discussing how to use them in your work.
Too often I see formulas that look something like: “=Sheet3!$e$5 * Sheet5!$AX$143”. What does that mean? It is so much better with “=Volume * Density”. My point is that we must use Excel’s naming capabilities when building user-friendly and sustainable workbooks.
Think about naming cells and ranges as you design and build your models. I will use the term “range” to mean a single cell or a collection of cells. Name them as soon as you create the spreadsheet; it is more difficult to return later to name the ranges. Names have a property called “scope.” A workbook scope, which is the default, means that formulas on every sheet can reference the named range directly. With a worksheet scope, only formulas that are on the same worksheet will find the range. Every sheet can have an identically named range with worksheet scope.

Global parameters
Give names to constants (values that rarely, if ever, change). Save a parameter that is applied throughout your model in a single place and give it a workbook-scope name. Every formula that needs that parameter refers to the name. I generally place these parameters on a Data worksheet. These are global parameters that may include values (eg, outside design temperature), text, or Boolean (TRUE or FALSE) values.
In the downloadable file for my ManageComments (see TCE, Issue 980), I include a worksheet cell named “ExecuteManageComments.” When set to TRUE, the ManageComments macro executes, but if set to FALSE the macro does not execute. You can insert a checkbox from the “Form Controls” selection on the Developer tab and link that checkbox to this named cell. Once linked, if you Copy and Paste the checkbox to other sheets all the copies will control the action to enable or disable ManageComments.
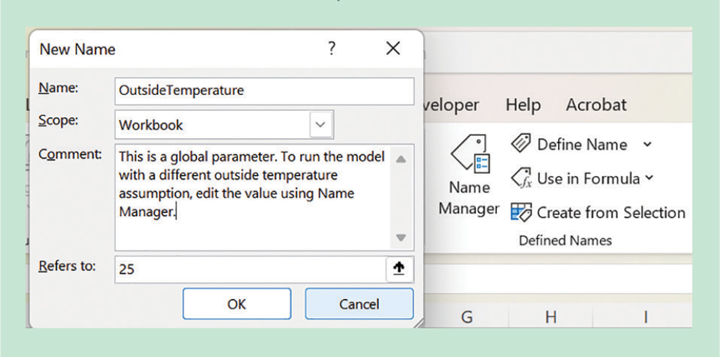
The “Name Manager” on the Formulas tab provides another way to name a numerical constant. Click the “New…” button (or click “Define Name” on the Ribbon) to bring up the “New Name” dialog. Enter a name (eg., “OutsideTemperature”) and Scope (Workbook or a specific worksheet). Enter the numerical value in the “Refers to:” input, then click OK. See Figure 1. One advantage for naming a constant in this manner is that the name and value will travel with the worksheet if you copy it to a different workbook. If, instead, the constant is named on a Data worksheet, copying a worksheet that references the cell to another workbook will cause the new workbook to Link to the original one. A disadvantage (or advantage depending upon perspective) is that the value for the constant is hidden in the Name, and “Name Manager” must be used to edit it.
Managing groups of cells
Name ‘Input Cells” as a group. The “Refers To” input in Name Manager can specify discontinuous ranges of cells. Separate the ranges with commas, or click on each cell to include while holding down the <ctrl> key. This gives a fast path to perform group formatting and protection. After naming the group, select every cell by pressing <ctrl><g>, and select the name from the “Go To” dialog. Then, you can apply any formatting such as number, alignment, font, border, fill, and protection to all at once.
You can also refer to the group name when defining Conditional Formatting. However, after you enter the name in the “Applies to” dialog, Excel replaces it with the actual cell locations. If you later change the list of cells that are referenced by the group name, the conditional formatting is not updated automatically.
We often want to highlight cells that require user input to a model. You might not want the highlighting to be displayed permanently. Use Conditional Formatting to turn on the highlighting, such as a colored fill or heavy border, when a checkbox is selected. Do this by 1) creating a group name for all of the input cells, 2) adding and naming a Boolean cell (e.g., “HighlightInputs”), 3) adding a checkbox from the Forms dialog (Developer tab) linked to the cell as described above, and 4) creating a Conditional Formatting rule from a formula “=IF(HighlightInputs,TRUE,FALSE).”
Name a range or group of ranges to link cells to a macro. Excel monitors “Events” such as clicking (or double-clicking) a cell, changing a cell value, or deleting a value. A corresponding subroutine, if present on the worksheet’s VBA page, executes whenever a monitored event occurs.
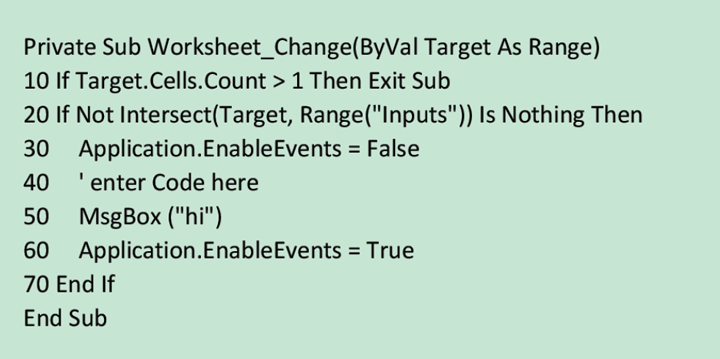
I generally use the structure in Listing 1 to monitor changes to a group of cells. Whenever any cell or cells on the worksheet are changed, Excel runs the subroutine “Worksheet_Change.” “Target” is a range reference to the cell(s) that were changed, and in Line 10 (line numbers are optional, given here for clarity) I am only going to continue if a single cell is changed. Line 20 detects if the changed cell is part of the group that is named “Inputs.”
Line 30 is very important. It disables the event handler so that further changes to the worksheet will not be detected. I assume that when a change is made to one of the Inputs, VBA code is executed that modifies something on the worksheet. Without this line, Excel will run this macro again with every change that the code makes that, in some cases, will cause an infinite loop. However, if the event handler is not reenabled (Line 60) after the code executes, further changes will not be detected. If the code at Line 40 is interrupted due to an error, then the event handler will not be reenabled; the user would then need to manually reenable it, which might require them to open the VBA application and type in Line 60 in the “Immediate” window. The better solution to this problem is to provide error handling in the code that reenables event handling before exiting.
Recent Editions
Catch up on the latest news, views and jobs from The Chemical Engineer. Below are the four latest issues. View a wider selection of the archive from within the Magazine section of this site.